Joan Bono
twitter: @joan_bono
Website: joanbono.github.io
Company: PEW PEW PEW
Non-aware Proxy apps with Wireguard
This post is heavily based on Nviso’s post about intercepting Flutter traffic on iOS, but instead of using OpenVPN, we are going to use Wireguard.
First of all, thanks to my friend @damiapoquet, for his help during the painful troubleshooting.
Requirements:
- Nviso Flutter Test apps
- Jailbroken iOS device (I’m using an iPhone SE running iOS 14.3 with checkra1n)
- Rooted Android device (I’m using a Xiaomi Redmi 9c with Pixel Experience)
- Computer (Macbook Pro in my case, Linux instructions below)
Configuring the server
Initial setup
$ brew install wireguard-tools
$ mkdir /usr/local/etc/wireguard/
Create the following files inside. Replace the interface you have on your Macbook (en0 in this case), and the internal IP range you want to use (10.0.10.0/24 in the example):
postup.sh
#!/bin/sh

# 1) Preparing the directory which we'll persist the pf token
#    generated by (2) in. That token can then be used by our
#    postdown.sh script to remove the routing rule in the
#    event Wireguard is shut down on the server.
mkdir -p /usr/local/var/run/wireguard
chmod 700 /usr/local/var/run/wireguard

# 2) Dynamically add the NAT rule, enable the firewall, increase
#    its reference count (-E) and persist the reference token
#    generated by the command into pf_wireguard_token.txt,
#    which postdown.sh will reference when Wireguard is shut
#    down.
echo 'nat on en0 from 10.0.10.0/24 to any -> (en0)' | \
    pfctl -a com.apple/wireguard -Ef - 2>&1 | \
    grep 'Token' | \
    sed 's%Token : \(.*\)%\1%' > /usr/local/var/run/wireguard/pf_wireguard_token.txt
postdown.sh
#!/bin/sh

# 1) Fetch the pf reference token that was generated on
#    Wireguard startup with postup.sh
TOKEN=`cat /usr/local/var/run/wireguard/pf_wireguard_token.txt`

# 2) Remove the reference (and by extension, the pf rule that
#    generated it). Adding and removing rules by references
#    like this will automatically disable the packet filter
#    firewall if there are no other references left, but will
#    leave it up and intact if there are.
ANCHOR='com.apple/wireguard'
pfctl -a $ANCHOR -F all || exit 1
echo "Removed rule with anchor: $ANCHOR"

pfctl -X $TOKEN || exit 1
echo "Removed reference for token: $TOKEN"

rm -f /usr/local/var/run/wireguard/pf_wireguard_token.txt
echo "Deleted token file"
Give execution permissions to the scripts:
$ chmod u+x /usr/local/etc/wireguard/*.sh
Generate a key pair for the server and for the device. Store them safely:
$ umask 077
$ wg genkey | tee privatekey | wg pubkey > publickey
$ wg genkey | tee privatekey_iPhone | wg pubkey > publickey_iPhone
And create the wg0.conf file. This file will be the server configuration.
[Interface]
Address = 10.0.10.1/24
PrivateKey = ${PRIVATE_KEY_VALUE}
ListenPort = 51820
PostUp = /usr/sbin/sysctl -w net.inet.ip.forwarding=1
PostUp = /usr/local/etc/wireguard/postup.sh
PostDown = /usr/local/etc/wireguard/postdown.sh
PostDown = /usr/sbin/sysctl -w net.inet.ip.forwarding=0

[Peer]
# Jailbroken iPhone SE
PublicKey = ${Public_key_for_device}
AllowedIPs = 10.0.10.10/32
Let’s break it down:
- Interface
Addresswill be the server address in the VPN.PrivateKeyis the private key for the server.ListenPortis the listening port,51820is the default.PostUpwill execute these commands when the interface for the VPN is up.PostDownwill execute these commands when the interface for the VPN is down.
- Peer
PublicKeyis the device public key generated above, and stored inpublickey_iPhoneif following the commands.AllowedIPsIP address which the device with that public key will have.
Time to test it setting the service up, and then down for our wg0:
$ sudo wg-quick up wg0
[#] wireguard-go utun
[+] Interface for wg0 is utun5
[#] wg setconf utun5 /dev/fd/63
[#] ifconfig utun5 inet 10.0.10.1/24 10.0.10.1 alias
[#] ifconfig utun5 up
[#] route -q -n add -inet 10.0.10.10/32 -interface utun5
[+] Backgrounding route monitor
[#] /usr/sbin/sysctl -w net.inet.ip.forwarding=1
net.inet.ip.forwarding: 0 -> 1
[#] /usr/local/etc/wireguard/postup.sh

$ sudo wg-quick down wg0
[+] Interface for wg0 is utun5
[#] rm -f /var/run/wireguard/utun5.sock
[#] rm -f /var/run/wireguard/wg0.name
[#] /usr/local/etc/wireguard/postdown.sh
[#] /usr/sbin/sysctl -w net.inet.ip.forwarding=0
net.inet.ip.forwarding: 1 -> 0
Perfect. Time to move to the client. Install wireguard from the AppStore and then go back to the server.
We are going to generate the configuration file for each device in the server. The following example is iPhone_wg.conf:
[Interface]
PrivateKey = ${Device_Private_Key}
Address = 10.0.10.10/32
DNS = 8.8.8.8, 1.1.1.1

[Peer]
PublicKey = ${Server_Public_key}
AllowedIPs = 0.0.0.0/0
Endpoint = 192.168.89.196:51820
- Interface
PrivateKey, is the device private key,privatekey_iPhonein this post.Addressis the address assigned also in the server configuration file,10.0.10.10/32in this case.DNSto be used, in this case,8.8.8.8and1.1.1.1.
- Peer
PublicKeyfrom the server generated before,publickeyin this article.AllowedIPsset to0.0.0.0/0to redirect all the traffic through the Wireguard server.Endpointis the computer IP and the port configured.
Now, my recommendation is to use qrencode to generate a QR with the configuration:
$  qrencode --read-from=iPhone_wg.conf --type=UTF8
█████████████████████████████████████████████████████████
█████████████████████████████████████████████████████████
████ ▄▄▄▄▄ █▄█ ▄ ▄ ▄▄▀█▄ ▀█▀▄▄ ▄▀▀ ▄▀▄ ▄ ▀▀▀ █ ▄▄▄▄▄ ████
████ █   █ █ ▄██▀▀█  █  ▀▄█▄▄▄█▀█▀ ▀▄▄▄▀  █ ▄█ █   █ ████
████ █▄▄▄█ █▄█ █▄▀ █▀▄▄▀ ▄ ▄▄▄  █▀▀▄▄ ▀█▄▄▀███ █▄▄▄█ ████
████▄▄▄▄▄▄▄█▄▀ ▀ █ █▄▀▄▀ ▀ █▄█ ▀ █▄▀ ▀ █ █▄▀▄█▄▄▄▄▄▄▄████
████▄ ▄ ██▄▀▄▄▀▄▄█▄█ ▀▄▄▀█▄   ▄▀█ ▀ ▄   ▀▀▀█  █▀▄▄▄█▄████
█████ ▄▀▄▀▄█ █▀▀▀▀▄██▀▄█▄█  ▀ █▀█ ▀   ██    ▀▄▄▄▄▀▀▄█████
███████▄█▀▄▀▄▄ █ █▀▄▀▄█ ▄ ▄▀ ██▄█ ▄ █▀▄▄▄▄▀ ▄█▄▄█▄ ▄ ████
████▀  ██▄▄▄█▄▄▀ ██▀▄█ █   ▄▀▀▄▀▄█▀ ▄▄▄█ ▄  ▀   ▄▄▄▄█████
████▄  ▀█ ▄▀▄  ▀▀█▀▄▄█ ▄▀▄ ▀▄██▄ ▀▀██ █ ▄  ▄█▄▀██▀▀▀ ████
█████  █ █▄█▄▀█▀▀▄▄ █▀▀█▀ ▄█  █▄ ▀ ▄ ▄▄  ▄▀▀▀▀▄▄ ▀█▄▄████
████▀▀██▄▀▄▀ ▀▀▄ █▄▀▄█  ▀  ▄▄ ▀█ ▀ ▀▀█▄▄█▄██▄▀  █ ██▄████
████  █▄ ▄▄▄ ▀ █ ▀█ ▀▄██▄▀ ▄▄▄ ▀█ ▀▄█  █▀▄█▄ ▄▄▄  █▀█████
██████▀  █▄█ ▀  ▀▄  ▀█▀██▀ █▄█ ▄▄▀   ▀▀██ ██ █▄█ ██▀█████
████▄▄  ▄▄▄ ▄▀▀█▀ █▀▄   ▀▀   ▄▄█ █▀▀▄ █▀█ ▀▀ ▄▄  ██  ████
████  ▀  ▄▄▀▄▀▄█▄█▄▄▄▀ ▄▄▀██▀▄▄ █▀█▄▄▀ ▀█ ▄█▄▄█▀█▀ ██████
████▀▄▄▀ ▄▄ ▄▄▄ █▄▀▄▀▀█▄█▄█  █▀▄█▀█ █ ▄▄ █▄▀▀▄▀ ██▀▄ ████
████ ▀▀▄  ▄▄▀ █▄▄▄▀▀ ▄▄ ██▄▄▀▄█ █▀█ ▄▀▄▀ ▀█▀ ▀ ▀██▄▀ ████
████▄ █ ▀▀▄▀▀▀ ▀▄ ▀█▀▄▄  ▀▀▄▀▀ ▀▄▀▄▀ █▄▄  █▀█▀▀▄▄▀  ▄████
██████▀█▀█▄▀▀   ▄▄ ▄▀█ ▄▄▄█ ▀ ▀▀██▄▄▀▀█ ▄█▀█▄ ▄██▄ ▄▄████
█████ ▀▀█▄▄▀▄ █▄▀▄▄ ██▀▄▄ ▄ ▀██▄ ▀ ▀▀ ▀▄▀  █▀█ ▀█  ▄▀████
████▄▄▄███▄█  ▀ █▀ ▄▄   ██ ▄▄▄ █ ▄▀██▄▀ ▄▄▄▀ ▄▄▄ ▄  ▄████
████ ▄▄▄▄▄ ███▄▄ ▀▀▄█  ▄▀  █▄█ ▄▀█▄▀█ █ ▄▀▀▄ █▄█ ▀███████
████ █   █ █▀█▄▀█ ██▄██▄▀▄ ▄▄▄   ▀▀▀███ █ ██▄  ▄ ▀█▀█████
████ █▄▄▄█ █     ██  ▄▄█▄▀ ▄▄ ▄█▀█▄█ ▀  ▄ ██  ▄▄ ▄█▄█████
████▄▄▄▄▄▄▄█▄████▄█▄▄▄█▄█▄██▄▄██▄█▄█▄██▄█▄█▄█████▄▄▄▄████
█████████████████████████████████████████████████████████
█████████████████████████████████████████████████████████
Import a new configuration from QR:
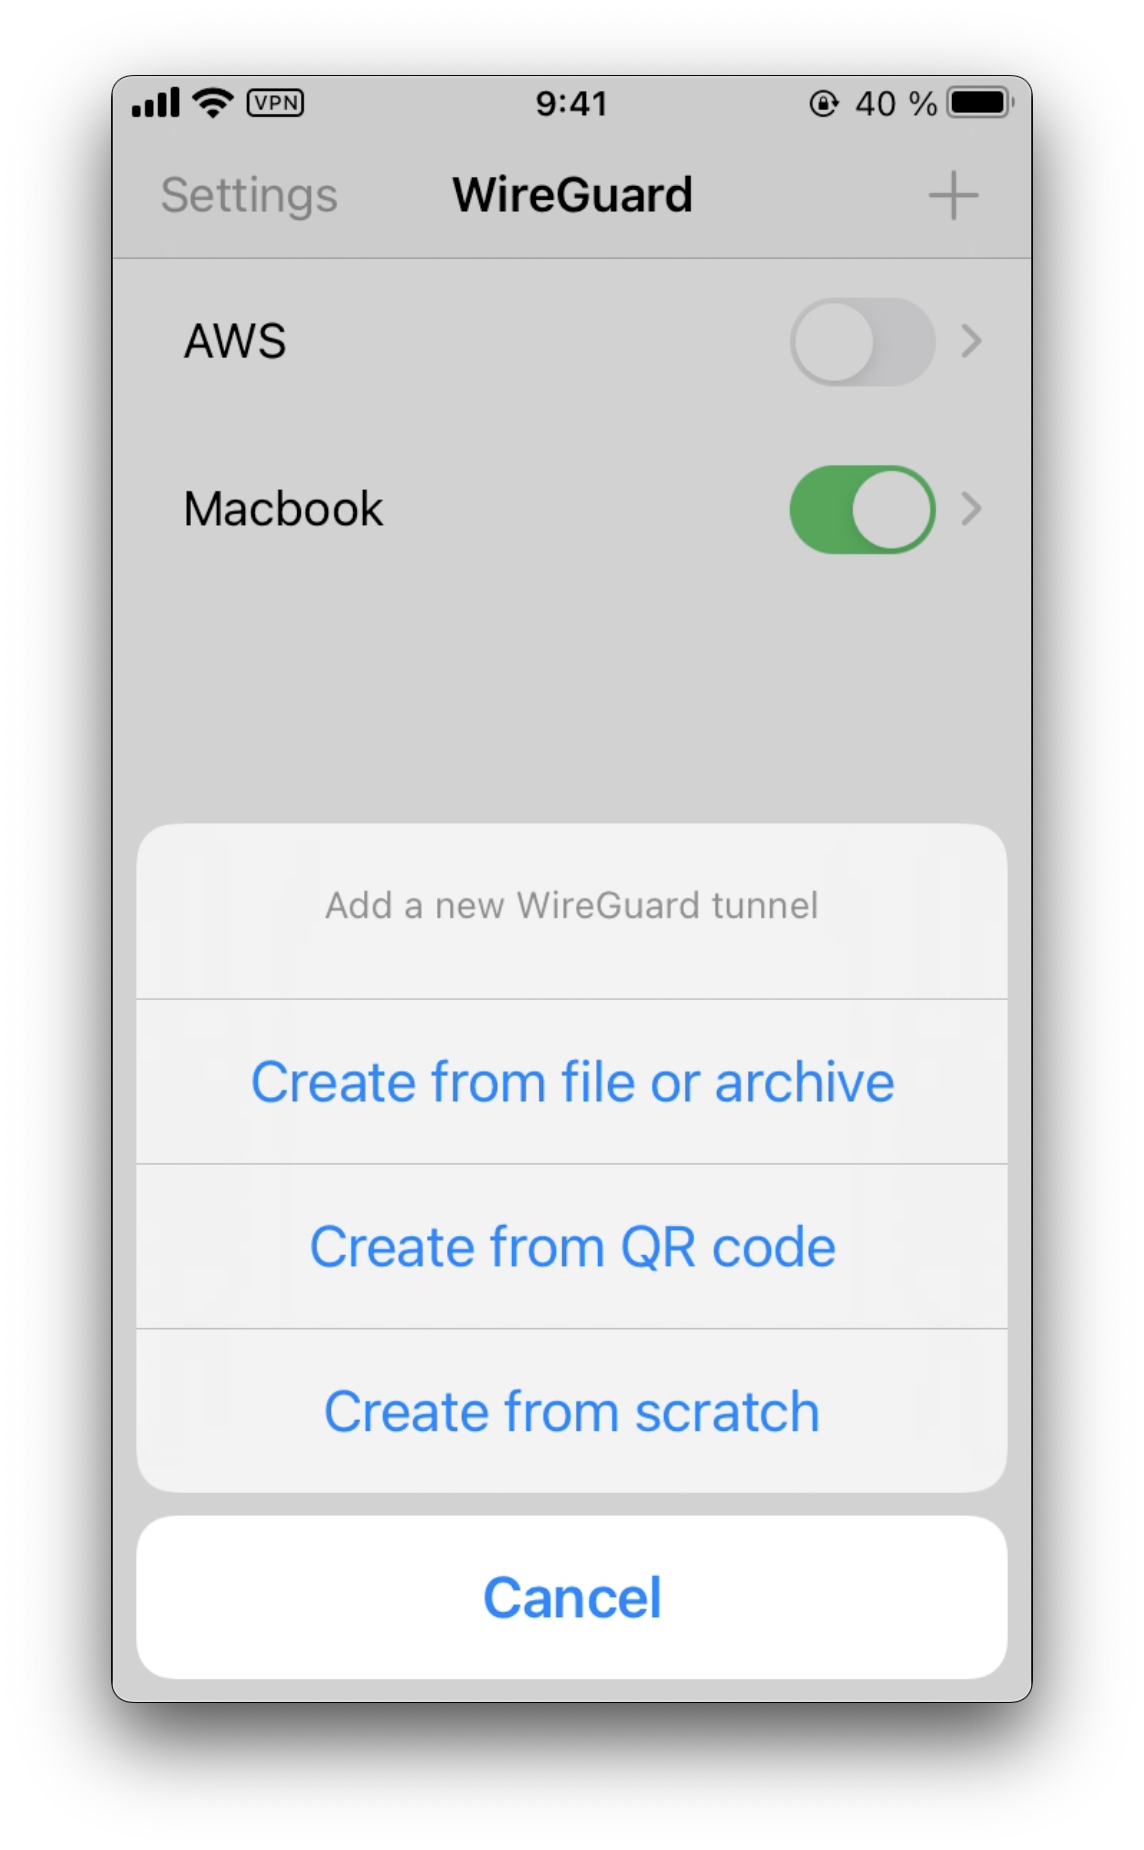
Start the server:
$ sudo wg-quick up wg0
And start the switch on the Wireguard application.
⚠️ Troubleshoting Capture the incoming traffic to your Macbook on the principal interface to confirm that the traffic is coming through
$ sudo tcpdump -i en0 -nn udp and port 51820
Intercept the traffic
After installing the application, it’s time to redirect all the incoming traffic to Burp port. This section should be done with macOS pf (Thanks @virtualminds for the help in this part):
$ echo """
nat on en0 from 10.0.10.0/24 to any -> (en0)
rdr on utun3 inet proto tcp from any to any port {443, 80} -> 10.0.10.1 port 8080
""" | sudo pfctl -a com.apple/wireguard -Ef -
Open Burp listening on the Wireguard IP (or all interfaces if you prefer) and enable Invisible Proxy.
Open the Nviso’s Flutter app, and try to make an HTTP request. You should see it in Burp:

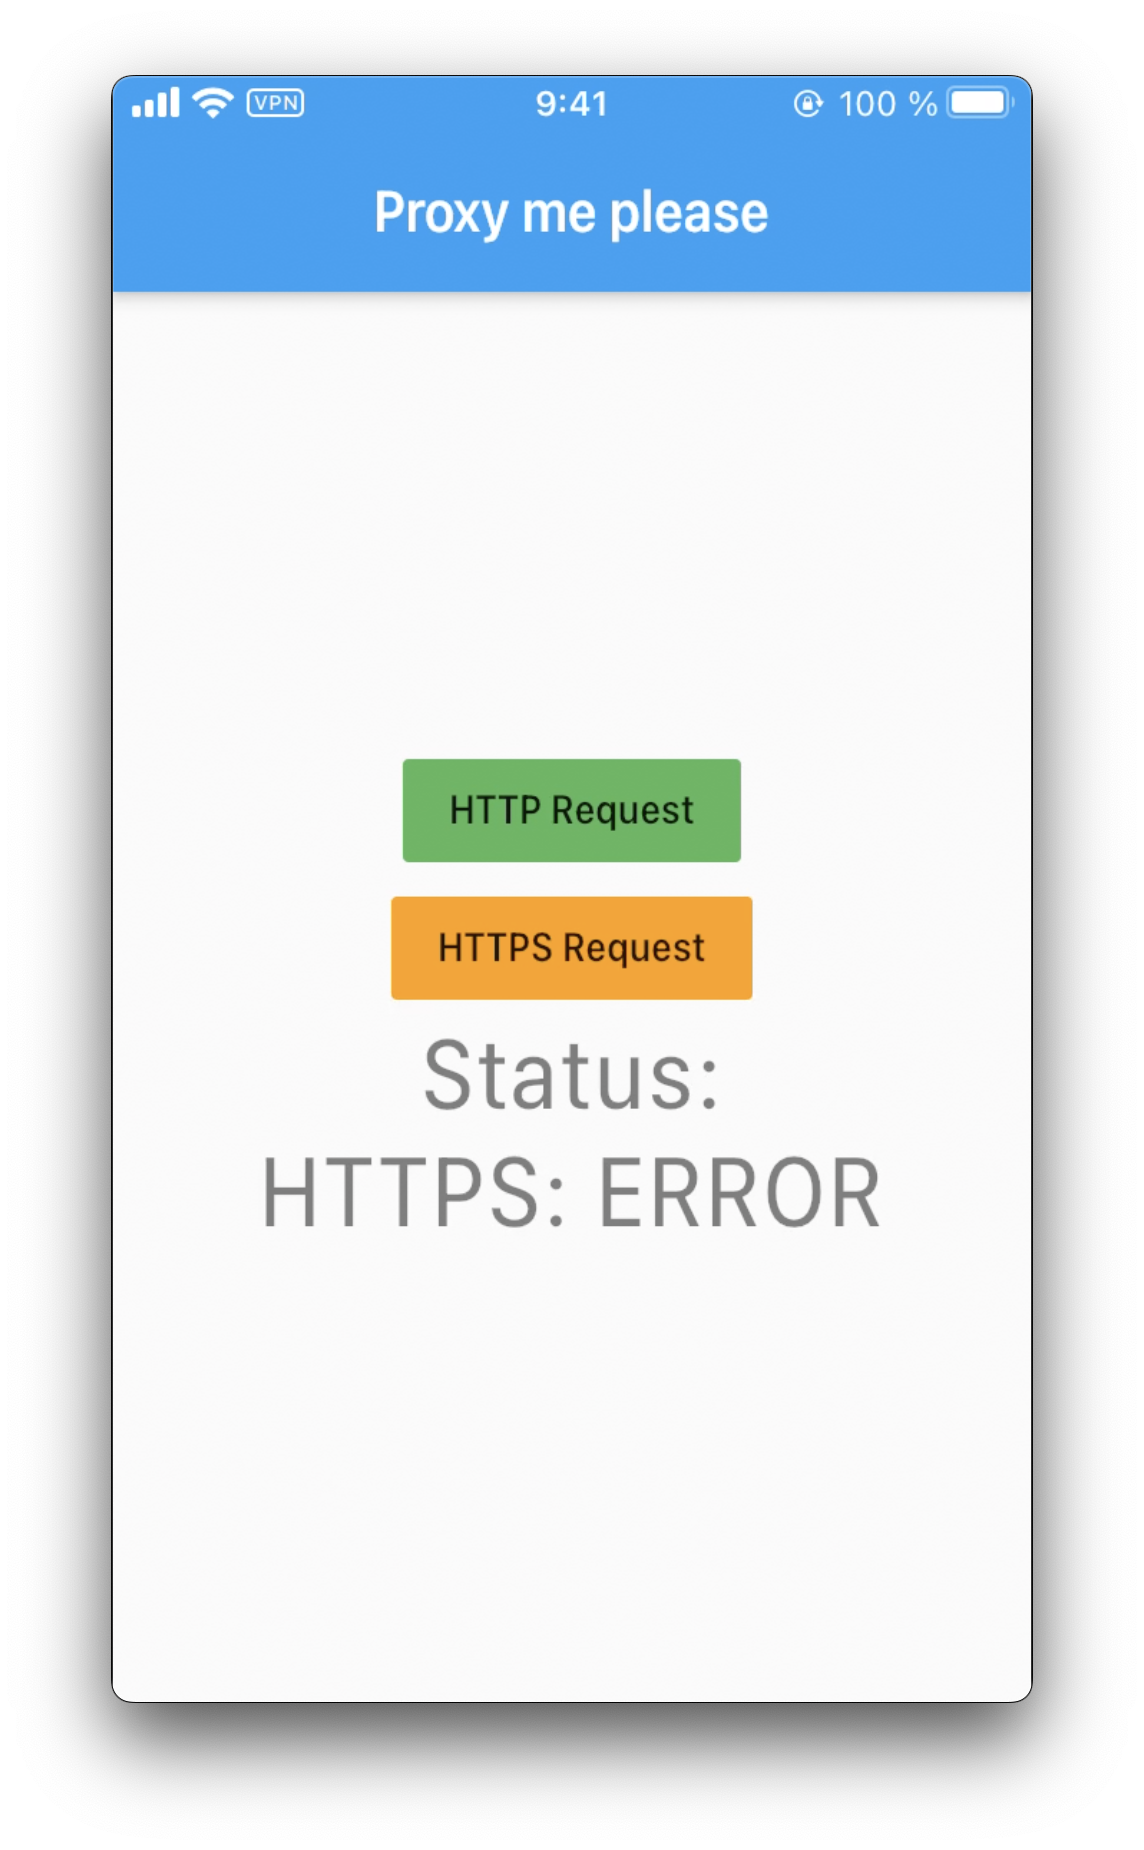
Next, attempt to perform the HTTPS Request, and it will fail:
Time to use the disable-flutter-tls-verification.js Frida script:
$ frida -U -l disable-flutter-tls.js -f be.nviso.flutterApp --no-pause
     ____
    / _  |   Frida 15.1.8 - A world-class dynamic instrumentation toolkit
   | (_| |
    > _  |   Commands:
   /_/ |_|       help      -> Displays the help system
   . . . .       object?   -> Display information about 'object'
   . . . .       exit/quit -> Exit
   . . . .
   . . . .   More info at https://frida.re/docs/home/
Spawning `be.nviso.flutterApp`...
[+] iOS environment detected
[+] Flutter library found
[!] ssl_verify_peer_cert not found. Trying again...
Spawned `be.nviso.flutterApp`. Resuming main thread!
[iPhone::be.nviso.flutterApp]-> [+] ssl_verify_peer_cert found at offset: 0x3f2444
Attempt to make the request again:
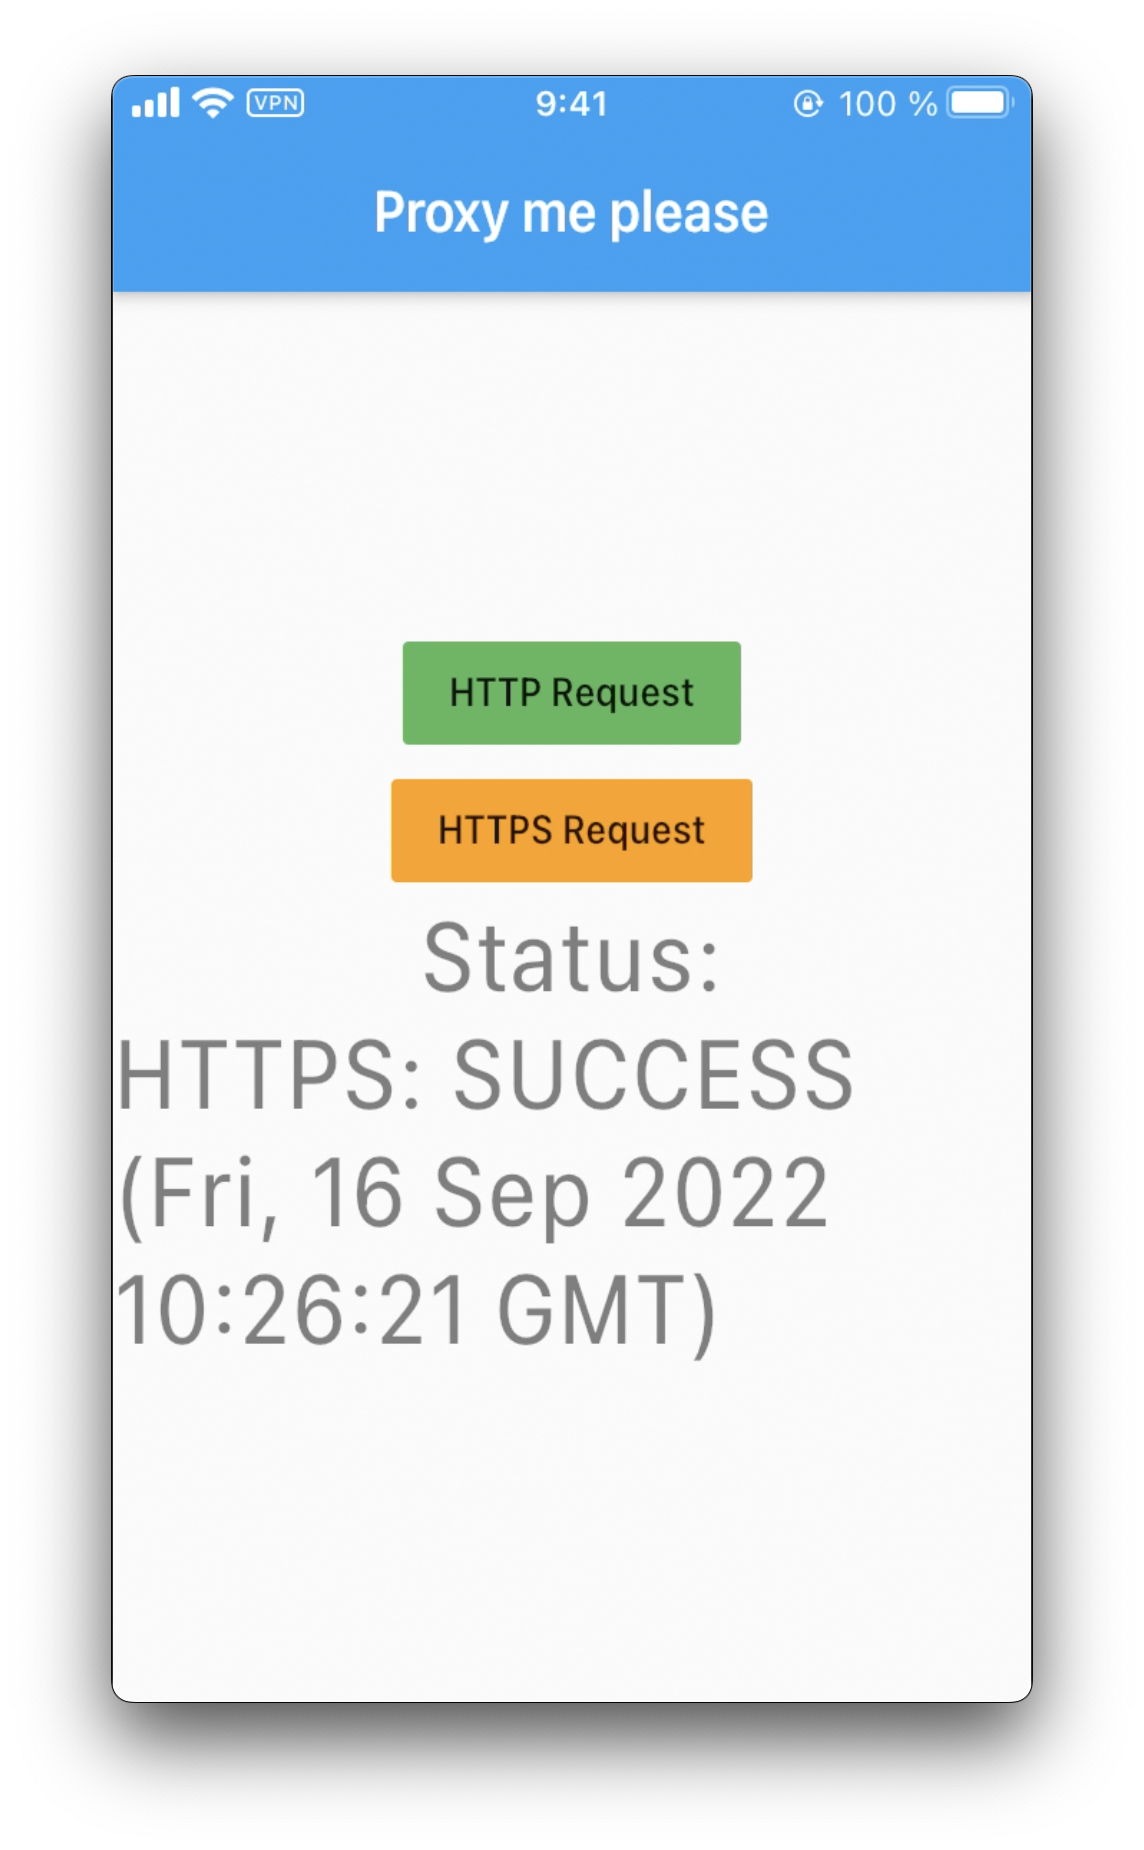
It works!
When you are done, you can disable Wireguard and pf from the CLI:
$ sudo wg-quick down wg0
$ sudo pfctl -d
References
- https://barrowclift.me/post/wireguard-server-on-macos
- https://blog.nviso.eu/2020/06/12/intercepting-flutter-traffic-on-ios/
- https://www.digitalocean.com/community/tutorials/how-to-set-up-wireguard-on-ubuntu-20-04
Example for Linux Wireguard Server
The following example is a configuration file for Linux. Note that net.ipv4.ip_forward will need to be set as 1 on /etc/sysctl.conf.
I have it located at /etc/wireguard/wg0.conf:
[Interface]
Address = 10.0.10.1/24
#SaveConfig = true
# Add net.ipv4.ip_forward = 1 to /etc/sysctl.conf
PostUp = ufw route allow in on wg0 out on eth0
PostUp = iptables -t nat -I POSTROUTING -o eth0 -j MASQUERADE
PostUp = iptables -A FORWARD -i wg0 -j ACCEPT; iptables -t nat -A POSTROUTING -o eth0 -j MASQUERADE
PreDown = ufw route delete allow in on wg0 out on eth0
PreDown = iptables -t nat -D POSTROUTING -o eth0 -j MASQUERADE
PostDown = iptables -D FORWARD -i wg0 -j ACCEPT; iptables -t nat -D POSTROUTING -o eth0 -j MASQUERADE
ListenPort = 51820
PrivateKey = ${Server_Private_Key}

[Peer]
PublicKey = ${Client_Public_Key}
AllowedIPs = 10.0.10.2/32